git submoduleを別のブランチに切り替える
submoduleのディレクトリに入ってブランチを切り替えてから、コミットするだけでした。
$ git submodule status
 xxxxxxxxxxxxxxxxxxxxxxxxxxxxxxxxxxxxxxxx foo (heads/master)
 yyyyyyyyyyyyyyyyyyyyyyyyyyyyyyyyyyyyyyyy bar (heads/master)
ってなってて、barの方をdevelopに変えたいとする。
$ cd bar
$ git checkout develop
Previous HEAD position was aaaaaaa... コメント
Branch develop set up to track remote branch develop from origin.
Switched to a new branch 'develop'
これでbar外に出てコミットするだけ。簡単でした。
- 追記
developのままで最新化するのはgit pullするだけでした。
WindowsでIPv4をIPv6より優先させる
なんかWindowsクライアントからくるリクエストがIPv6の時があるので調べてみた。
- 現状確認
デフォルトではIPv6、IPv4ともに有効になっているが優先順位はどうなっているのか?
>netsh interface ipv6 show prefixpolicies
アクティブ状態を照会しています...

優先順位   ラベル  プレフィックス
----------  -----  --------------------------------
        50      0  ::1/128
        40      1  ::/0
        35      4  ::ffff:0:0/96
        30      2  2002::/16
         5      5  2001::/32
         3     13  fc00::/7
         1     11  fec0::/10
         1     12  3ffe::/16
         1      3  ::/96
優先順位35の::ffff:0:0/96がIPv4マップということらしい。
こいつを最優先にしてみる。
- 設定
ぐぐると優先順位50の::1/128と入れ替えろというのが見られるが面倒なので優先順位を50より高くしてみる。
>netsh interface ipv6 set prefixpolicy ::ffff:0:0/96 60 4
OK


>netsh interface ipv6 show prefixpolicies
アクティブ状態を照会しています...

優先順位   ラベル  プレフィックス
----------  -----  --------------------------------
        60      4  ::ffff:0:0/96
        50      0  ::1/128
        40      1  ::/0
        30      2  2002::/16
         5      5  2001::/32
         3     13  fc00::/7
         1     11  fec0::/10
         1     12  3ffe::/16
         1      3  ::/96
どうやら、上手くいってるっぽい。
Macで共有フォルダに.DS_Storeを作らない
Windowsの人に嫌がられるし、共有ストレージ先だけに作成しないように出来ます。
ターミナルを起動して以下のようにするだけ。
$ defaults write com.apple.desktopservices DSDontWriteNetworkStores true
つーか、Thums.dbは・・・
VMWare ESXiのcoredumpを違うデータストアへ移動する
デフォルトで出来たダンプファイルを別のデータストアに移します。
ESXi 6.5でやってるけど5.x系でも多分いけると思う。
- まず状態を確認
# esxcli system coredump file list
Path                                                                                                               Active  Configured       Size
-----------------------------------------------------------------------------------------------------------------  ------  ----------  ---------
/vmfs/volumes/52e6c5e2-eaf60c28-9344-6805ca1f75d3/vmkdump/3F7CF380-5BCB-11D9-BAC1-BCEE7B98EEB3-749731840.dumpfile    true        true  749731840
- 次に別のデータストアに新しいダンプファイルを作成する。
# esxcli system coredump file add -d new_datastore
# esxcli system coredump file list
Path                                                                                                               Active  Configured       Size
-----------------------------------------------------------------------------------------------------------------  ------  ----------  ---------
/vmfs/volumes/52e6c5e2-eaf60c28-9344-6805ca1f75d3/vmkdump/3F7CF380-5BCB-11D9-BAC1-BCEE7B98EEB3-749731840.dumpfile    true        true  749731840
/vmfs/volumes/53461c2b-c63b7879-21a4-6805ca1f75d3/vmkdump/3F7CF380-5BCB-11D9-BAC1-BCEE7B98EEB3.dumpfile             false       false  749731840
- 今作ったダンプファイルをActiveに設定
- すると従来のダンプファイルはinactiveに変わります。
# esxcli system coredump file set -p /vmfs/volumes/53461c2b-c63b7879-21a4-6805ca1f75d3/vmkdump/3F7CF380-5BCB-11D9-BAC1-BCEE7B98EEB3.dumpfile
# esxcli system coredump file list
Path                                                                                                               Active  Configured       Size
-----------------------------------------------------------------------------------------------------------------  ------  ----------  ---------
/vmfs/volumes/52e6c5e2-eaf60c28-9344-6805ca1f75d3/vmkdump/3F7CF380-5BCB-11D9-BAC1-BCEE7B98EEB3-749731840.dumpfile   false       false  749731840
/vmfs/volumes/53461c2b-c63b7879-21a4-6805ca1f75d3/vmkdump/3F7CF380-5BCB-11D9-BAC1-BCEE7B98EEB3.dumpfile              true        true  749731840
- 最後に従来のダンプファイルを削除
# rm 3F7CF380-5BCB-11D9-BAC1-BCEE7B98EEB3-749731840.dumpfile
# esxcli system coredump file list
Path                                                                                                     Active  Configured       Size
-------------------------------------------------------------------------------------------------------  ------  ----------  ---------
/vmfs/volumes/53461c2b-c63b7879-21a4-6805ca1f75d3/vmkdump/3F7CF380-5BCB-11D9-BAC1-BCEE7B98EEB3.dumpfile    true        true  749731840
これで切り替わった!
VMWare ESXi 6.5をUpdate 1へアップデートする
昨日出たばかりのESXi 6.5 Update 1を入れてみる。
VMware ESXi 6.5 Update 1 Release Notes
# esxcli software sources profile list -d /vmfs/volumes/datastore/update-from-esxi6.5-6.5_update01.zip
Name                              Vendor        Acceptance Level
--------------------------------  ------------  ----------------
ESXi-6.5.0-20170701001s-no-tools  VMware, Inc.  PartnerSupported
ESXi-6.5.0-20170702001-standard   VMware, Inc.  PartnerSupported
ESXi-6.5.0-20170701001s-standard  VMware, Inc.  PartnerSupported
ESXi-6.5.0-20170702001-no-tools   VMware, Inc.  PartnerSupported

# esxcli software profile update -p ESXi-6.5.0-20170702001-standard -d /vmfs/volumes/datastore/update-from-esxi6.5-6.5_update01.zip
Update Result
   Message: The update completed successfully, but the system needs to be rebooted for the changes to be effective.
   Reboot Required: true
   VIBs Installed: VMW_bootbank_ehci-ehci-hcd_1.0-4vmw.650.0.14.5146846, ...(snip)..., VMware_locker_tools-light_6.5.0-0.23.5969300
   VIBs Removed: VMW_bootbank_ehci-ehci-hcd_1.0-3vmw.650.0.0.4564106, ...(snip)..., VMware_locker_tools-light_6.5.0-0.0.4564106
   VIBs Skipped: VMW_bootbank_ata-libata-92_3.00.9.2-16vmw.650.0.0.4564106, ...(snip)..., VMware_bootbank_rste_2.0.2.0088-4vmw.650.0.0.4564106
今回はアップグレードに10分ちょい掛かりました。
どうやら今のところSSDにアクセスしても快調に動いてます!やったね!!!
JIRAのスプリントヘルスガジェットが表示できない
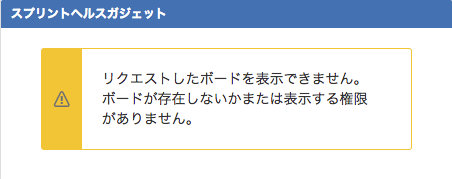
「リクエストしたボードを表示できません。ボードが存在しないかまたは表示する権限がありません。」というエラーになってしまいます。

調べたら不具合らしい。
ダッシュボード上で「スプリントヘルスガジェット」及び「スプリントガジェット内の残り日数」が正しく表示されない - Atlassian Documentation
ここに乗っているとおり、英語に設定してからガジェットを登録し直したらちゃんと表示されました。
が、日本語設定でガジェットの設定を開いて保存すると再発する。
毎回設定を変えるのは面倒なのでデフォルトの管理者ユーザを英語設定にしてそちらでメンテすることにしたけど・・・。 早く直って欲しいぞ。
バグチケットは報告されているようなのでvoteしておきました。
MacでGoのクロスコンパイルを出来るようにする
ぐぐると --cross-compile-common を付けて brew install しなさいと出るけど引数変わってた。
$ brew install go --cross-compile-common
Warning: go: this formula has no --cross-compile-common option so it will be ignored!
==> Downloading https://homebrew.bintray.com/bottles/go-1.8.3.yosemite.bottle.tar.gz
######################################################################## 100.0%
==> Pouring go-1.8.3.yosemite.bottle.tar.gz
==> Using the sandbox
==> Caveats
A valid GOPATH is required to use the `go get` command.
If $GOPATH is not specified, $HOME/go will be used by default:
  https://golang.org/doc/code.html#GOPATH

You may wish to add the GOROOT-based install location to your PATH:
  export PATH=$PATH:/usr/local/opt/go/libexec/bin
==> Summary
🍺  /usr/local/Cellar/go/1.8.3: 7,035 files, 282.0MB


$ brew install go --with-cc-common
Warning: go: this formula has no --with-cc-common option so it will be ignored!
==> Downloading https://homebrew.bintray.com/bottles/go-1.8.3.yosemite.bottle.tar.gz
Already downloaded: /Users/gozu/Library/Caches/Homebrew/go-1.8.3.yosemite.bottle.tar.gz
==> Pouring go-1.8.3.yosemite.bottle.tar.gz
==> Using the sandbox
==> Caveats
A valid GOPATH is required to use the `go get` command.
If $GOPATH is not specified, $HOME/go will be used by default:
  https://golang.org/doc/code.html#GOPATH

You may wish to add the GOROOT-based install location to your PATH:
  export PATH=$PATH:/usr/local/opt/go/libexec/bin
==> Summary
🍺  /usr/local/Cellar/go/1.8.3: 7,035 files, 282.0MB