Windowsの人に嫌がられるし、共有ストレージ先だけに作成しないように出来ます。
ターミナルを起動して以下のようにするだけ。
$ defaults write com.apple.desktopservices DSDontWriteNetworkStores true
つーか、Thums.dbは・・・
Windowsの人に嫌がられるし、共有ストレージ先だけに作成しないように出来ます。
ターミナルを起動して以下のようにするだけ。
$ defaults write com.apple.desktopservices DSDontWriteNetworkStores true
つーか、Thums.dbは・・・
デフォルトで出来たダンプファイルを別のデータストアに移します。
ESXi 6.5でやってるけど5.x系でも多分いけると思う。
# esxcli system coredump file list
Path                                                                                                               Active  Configured       Size
-----------------------------------------------------------------------------------------------------------------  ------  ----------  ---------
/vmfs/volumes/52e6c5e2-eaf60c28-9344-6805ca1f75d3/vmkdump/3F7CF380-5BCB-11D9-BAC1-BCEE7B98EEB3-749731840.dumpfile    true        true  749731840
# esxcli system coredump file add -d new_datastore
# esxcli system coredump file list
Path                                                                                                               Active  Configured       Size
-----------------------------------------------------------------------------------------------------------------  ------  ----------  ---------
/vmfs/volumes/52e6c5e2-eaf60c28-9344-6805ca1f75d3/vmkdump/3F7CF380-5BCB-11D9-BAC1-BCEE7B98EEB3-749731840.dumpfile    true        true  749731840
/vmfs/volumes/53461c2b-c63b7879-21a4-6805ca1f75d3/vmkdump/3F7CF380-5BCB-11D9-BAC1-BCEE7B98EEB3.dumpfile             false       false  749731840
# esxcli system coredump file set -p /vmfs/volumes/53461c2b-c63b7879-21a4-6805ca1f75d3/vmkdump/3F7CF380-5BCB-11D9-BAC1-BCEE7B98EEB3.dumpfile
# esxcli system coredump file list
Path                                                                                                               Active  Configured       Size
-----------------------------------------------------------------------------------------------------------------  ------  ----------  ---------
/vmfs/volumes/52e6c5e2-eaf60c28-9344-6805ca1f75d3/vmkdump/3F7CF380-5BCB-11D9-BAC1-BCEE7B98EEB3-749731840.dumpfile   false       false  749731840
/vmfs/volumes/53461c2b-c63b7879-21a4-6805ca1f75d3/vmkdump/3F7CF380-5BCB-11D9-BAC1-BCEE7B98EEB3.dumpfile              true        true  749731840
# rm 3F7CF380-5BCB-11D9-BAC1-BCEE7B98EEB3-749731840.dumpfile
# esxcli system coredump file list
Path                                                                                                     Active  Configured       Size
-------------------------------------------------------------------------------------------------------  ------  ----------  ---------
/vmfs/volumes/53461c2b-c63b7879-21a4-6805ca1f75d3/vmkdump/3F7CF380-5BCB-11D9-BAC1-BCEE7B98EEB3.dumpfile    true        true  749731840
これで切り替わった!
昨日出たばかりのESXi 6.5 Update 1を入れてみる。
VMware ESXi 6.5 Update 1 Release Notes
# esxcli software sources profile list -d /vmfs/volumes/datastore/update-from-esxi6.5-6.5_update01.zip
Name                              Vendor        Acceptance Level
--------------------------------  ------------  ----------------
ESXi-6.5.0-20170701001s-no-tools  VMware, Inc.  PartnerSupported
ESXi-6.5.0-20170702001-standard   VMware, Inc.  PartnerSupported
ESXi-6.5.0-20170701001s-standard  VMware, Inc.  PartnerSupported
ESXi-6.5.0-20170702001-no-tools   VMware, Inc.  PartnerSupported

# esxcli software profile update -p ESXi-6.5.0-20170702001-standard -d /vmfs/volumes/datastore/update-from-esxi6.5-6.5_update01.zip
Update Result
   Message: The update completed successfully, but the system needs to be rebooted for the changes to be effective.
   Reboot Required: true
   VIBs Installed: VMW_bootbank_ehci-ehci-hcd_1.0-4vmw.650.0.14.5146846, ...(snip)..., VMware_locker_tools-light_6.5.0-0.23.5969300
   VIBs Removed: VMW_bootbank_ehci-ehci-hcd_1.0-3vmw.650.0.0.4564106, ...(snip)..., VMware_locker_tools-light_6.5.0-0.0.4564106
   VIBs Skipped: VMW_bootbank_ata-libata-92_3.00.9.2-16vmw.650.0.0.4564106, ...(snip)..., VMware_bootbank_rste_2.0.2.0088-4vmw.650.0.0.4564106
今回はアップグレードに10分ちょい掛かりました。
どうやら今のところSSDにアクセスしても快調に動いてます!やったね!!!
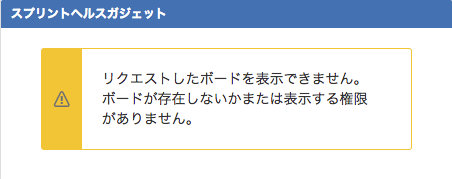
「リクエストしたボードを表示できません。ボードが存在しないかまたは表示する権限がありません。」というエラーになってしまいます。

調べたら不具合らしい。
ダッシュボード上で「スプリントヘルスガジェット」及び「スプリントガジェット内の残り日数」が正しく表示されない - Atlassian Documentation
ここに乗っているとおり、英語に設定してからガジェットを登録し直したらちゃんと表示されました。
が、日本語設定でガジェットの設定を開いて保存すると再発する。
毎回設定を変えるのは面倒なのでデフォルトの管理者ユーザを英語設定にしてそちらでメンテすることにしたけど・・・。 早く直って欲しいぞ。
バグチケットは報告されているようなのでvoteしておきました。
ぐぐると --cross-compile-common を付けて brew install しなさいと出るけど引数変わってた。
$ brew install go --cross-compile-common
Warning: go: this formula has no --cross-compile-common option so it will be ignored!
==> Downloading https://homebrew.bintray.com/bottles/go-1.8.3.yosemite.bottle.tar.gz
######################################################################## 100.0%
==> Pouring go-1.8.3.yosemite.bottle.tar.gz
==> Using the sandbox
==> Caveats
A valid GOPATH is required to use the `go get` command.
If $GOPATH is not specified, $HOME/go will be used by default:
  https://golang.org/doc/code.html#GOPATH

You may wish to add the GOROOT-based install location to your PATH:
  export PATH=$PATH:/usr/local/opt/go/libexec/bin
==> Summary
🍺  /usr/local/Cellar/go/1.8.3: 7,035 files, 282.0MB


$ brew install go --with-cc-common
Warning: go: this formula has no --with-cc-common option so it will be ignored!
==> Downloading https://homebrew.bintray.com/bottles/go-1.8.3.yosemite.bottle.tar.gz
Already downloaded: /Users/gozu/Library/Caches/Homebrew/go-1.8.3.yosemite.bottle.tar.gz
==> Pouring go-1.8.3.yosemite.bottle.tar.gz
==> Using the sandbox
==> Caveats
A valid GOPATH is required to use the `go get` command.
If $GOPATH is not specified, $HOME/go will be used by default:
  https://golang.org/doc/code.html#GOPATH

You may wish to add the GOROOT-based install location to your PATH:
  export PATH=$PATH:/usr/local/opt/go/libexec/bin
==> Summary
🍺  /usr/local/Cellar/go/1.8.3: 7,035 files, 282.0MB
↓ここを見ながらやってみる
my vmware(https://my.vmware.com/group/vmware/home) からZIPファイルをダウンロードしてESXiホストへ転送する
$ scp -p update-from-esxi6.0-6.0_update02.zip root@vmhost:/vmfs/volumes/datastore/update/.
VM全部落としてメンテナンスモードへ
まずはバージョンの確認
# esxcli system version get
   Product: VMware ESXi
   Version: 5.5.0
   Build: Releasebuild-1331820
   Update: 0
アップデート
# esxcli software profile update -p ESXi-6.0.0-20160302001-standard -d update-from-esxi6.0-6.0_update02.zip
 [MetadataDownloadError]
 Could not download from depot at zip:/var/log/vmware/update-from-esxi6.0-6.0_update02.zip?index.xml, skipping (('zip:/var/log/vmware/update-from-esxi6.0-6.0_update02.zip?index.xml', '', "Error extracting index.xml from /var/log/vmware/update-from-esxi6.0-6.0_update02.zip: [Errno 2] No such file or directory: '/var/log/vmware/update-from-esxi6.0-6.0_update02.zip'"))
        url = zip:/var/log/vmware/update-from-esxi6.0-6.0_update02.zip?index.xml
 Please refer to the log file for more details.
よくわからんエラーがでたが、どうやら esxcli コマンドには絶対パスを与える必要があるらしい。
ついでに最新らしいupdate03でやってみることにした。
# esxcli software sources profile list -d /vmfs/volumes/datastore/update/update-from-esxi6.0-6.0_update03.zip
Name                              Vendor        Acceptance Level
--------------------------------  ------------  ----------------
ESXi-6.0.0-20170202001-standard   VMware, Inc.  PartnerSupported
ESXi-6.0.0-20170201001s-standard  VMware, Inc.  PartnerSupported
ESXi-6.0.0-20170201001s-no-tools  VMware, Inc.  PartnerSupported
ESXi-6.0.0-20170202001-no-tools   VMware, Inc.  PartnerSupported

# esxcli software profile update -p ESXi-6.0.0-20170202001-standard -d /vmfs/volumes/datastore/update/update-from-esxi6.0-6.0_update03.zip
Update Result
   Message: The update completed successfully, but the system needs to be rebooted for the changes to be effective.
   Reboot Required: true
   VIBs Installed: VMWARE_bootbank_mtip32xx-native_3.8.5-1vmw.600.0.0.2494585, ...(snip)..., VMware_locker_tools-light_6.0.0-3.57.5050593
   VIBs Removed: VMware_bootbank_ata-pata-amd_0.3.10-3vmw.550.0.0.1331820, ...(snip)..., VMware_locker_tools-light_5.5.0-0.0.1331820
   VIBs Skipped:
5分位で適用できた!
# esxcli system version get
   Product: VMware ESXi
   Version: 6.0.0
   Build: Releasebuild-5050593
   Update: 3
   Patch: 57
ここで、一応仮想マシンが使えるか確認する。 VMFSはもともと5だったので特になにもせずにそのまま。
# esxcli software sources profile list -d  /vmfs/volumes/datastore/update/ESXi650-201704001.zip
Name                             Vendor        Acceptance Level
-------------------------------  ------------  ----------------
ESXi-6.5.0-20170404001-standard  VMware, Inc.  PartnerSupported
ESXi-6.5.0-20170404001-no-tools  VMware, Inc.  PartnerSupported

# esxcli software profile update -p ESXi-6.5.0-20170404001-standard -d /vmfs/volumes/datastore/update/ESXi650-201704001.zip

Update Result
   Message: The update completed successfully, but the system needs to be rebooted for the changes to be effective.
   Reboot Required: true
   VIBs Installed: VMW_bootbank_ata-libata-92_3.00.9.2-16vmw.650.0.0.4564106, ...(snip)..., VMware_locker_tools-light_6.5.0-0.0.4564106
   VIBs Removed: VMWARE_bootbank_mtip32xx-native_3.8.5-1vmw.600.0.0.2494585, ...(snip)..., VMware_bootbank_xhci-xhci_1.0-3vmw.600.2.52.4600944, VMware_locker_tools-light_6.0.0-3.57.5050593
   VIBs Skipped: VMW_bootbank_qlnativefc_2.1.30.0-11vmw.650.0.0.4564106, VMW_bootbank_sata-ahci_3.0-22vmw.650.0.0.4564106, VMware_bootbank_lsu-hp-hpsa-plugin_2.0.0-3vmw.650.0.0.4564106

# esxcli system version get
   Product: VMware ESXi
   Version: 6.5.0
   Build: Releasebuild-5310538
   Update: 0
   Patch: 19
今度はいとも簡単にできたー。
データストアについてはVMFS5からVMFS6へのアップデートは出来ないらしいので取り敢えずそのままです。
上の記事に続いて、gitが古いので新しくしておく
$ sudo add-apt-repository ppa:git-core/ppa
 The most current stable version of Git for Ubuntu.

For release candidates, go to https://launchpad.net/~git-core/+archive/candidate .
 More info: https://launchpad.net/~git-core/+archive/ubuntu/ppa
Press [ENTER] to continue or ctrl-c to cancel adding it

gpg: keyring `/tmp/tmpm1h_rrd0/secring.gpg' created
gpg: keyring `/tmp/tmpm1h_rrd0/pubring.gpg' created
gpg: requesting key E1DF1F24 from hkp server keyserver.ubuntu.com
gpgkeys: key E1DD270288B4E6030699E45FA1715D88E1DF1F24 can't be retrieved
gpg: no valid OpenPGP data found.
gpg: Total number processed: 0

$ sudo apt-key adv --keyserver hkp://pgp.mit.edu:80 --keyserver-options http-proxy=http://proxy.example.com:8080/ --recv-keys E1DF1F24
Executing: gpg --ignore-time-conflict --no-options --no-default-keyring --homedir /tmp/tmp.kL0BZJ0wMB --no-auto-check-trustdb --trust-model always --keyring /etc/apt/trusted.gpg --primary-keyring /etc/apt/trusted.gpg --keyserver hkp://pgp.mit.edu:80 --keyserver-options http-proxy=http://proxy.example.com:8080/ --recv-keys E1DF1F24
gpg: requesting key E1DF1F24 from hkp server pgp.mit.edu
gpg: key E1DF1F24: public key "Launchpad PPA for Ubuntu Git Maintainers" imported
gpg: Total number processed: 1
gpg:               imported: 1  (RSA: 1)

$ sudo aptitude update
$ sudo aptitude safe-upgrade
出来た
$ git version
git version 2.13.0